How to make a Pivot Table in Excel?
If you’re a Microsoft Excel user, you know that the program has powerful tools and features to help you analyze data quickly and efficiently.
One of the most useful features is the Pivot Table, which easily summarises data. A Pivot Table can quickly summarize large amounts of data into meaningful and useful information.
This tutorial is for you if you don’t know how to make a Pivot table in MS Excel. So keep reading and follow the steps.
What is a Pivot Table in Excel?
A Pivot Table in Excel is a powerful tool for summarizing and analyzing large amounts of data. It allows users to create customizable tables that organize and display data in a way that is easy to read and understand. With Pivot Tables, users can quickly and easily extract insights from large datasets without the need for complex formulas or manual calculations.
Pivot Tables can be used to answer a wide range of questions, such as “what is the total sales by product category?” or “what is the average revenue per customer by region?”. They are particularly useful for business analysts, financial analysts, and data scientists who need to work with large and complex datasets regularly. By using Pivot Tables, these professionals can save time and improve the accuracy of their analyses, allowing them to make more informed business decisions.
What is the use of Pivot Table in Excel?
The goal of pivot tables is to provide simple methods for quickly summarising vast volumes of data. They may be used to more clearly comprehend, present, and evaluate numerical data in depth and to find and respond to any unforeseen questions.
Here are seven fictitious situations where a pivot table may provide an answer:
- Comparing the overall sales of various items.
- Displaying product sales as a share of overall sales.
- Merging redundant data.
- Calculating the number of employees in various departments.
- Giving empty cells default values.
How to make a pivot table in Excel? 5 Steps
To create a Pivot Table in your Excel Sheet, follow these 5 steps below:
Step 1) Enter the range of Rows and Column
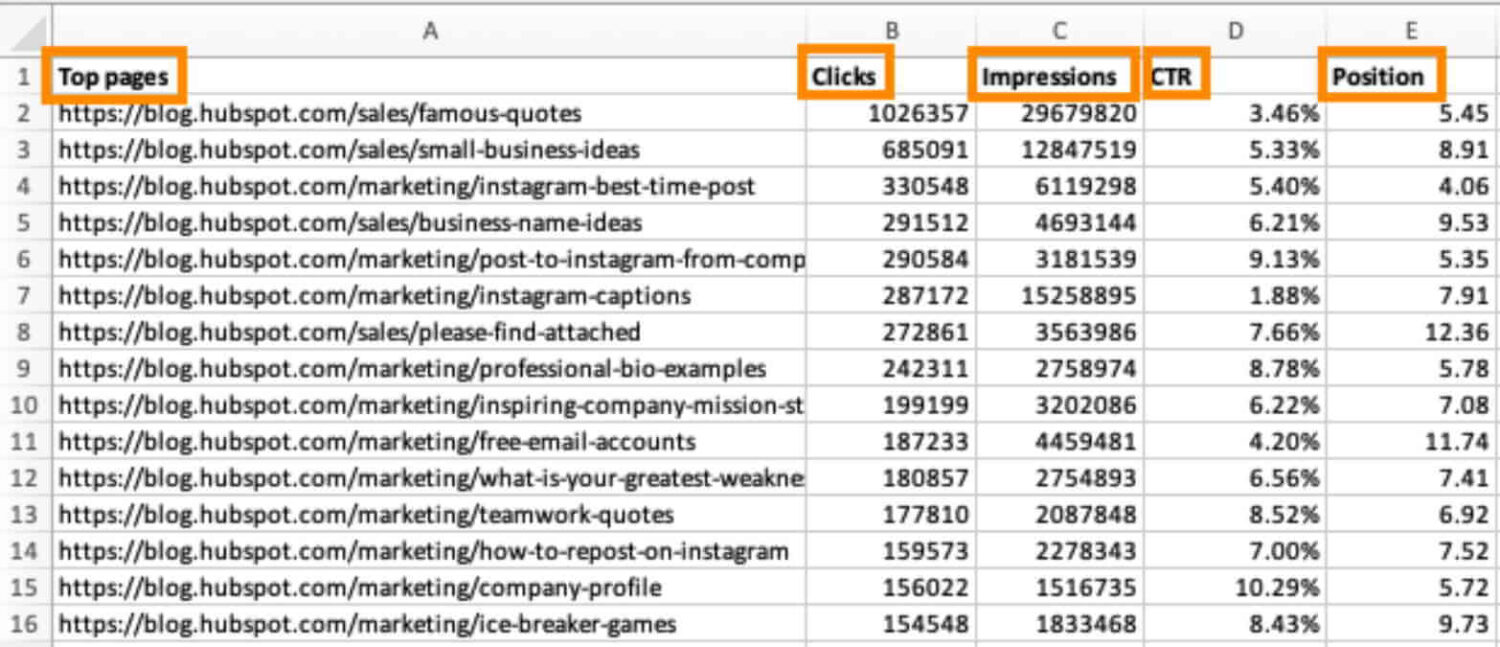
Every pivot table in Excel begins with a fundamental Excel table containing all your data. Insert your data into the designated rows and columns to build the table. Use the top row or column to group your values according to what they stand for.
A column listing each “Top Page,” a column listing each URL’s “Clicks,” a column showing each article’s “Impressions,” and so on may be included in an Excel table with blog post performance statistics, for instance. (In the stages that follow, we’ll use that example.)

Step 2) Sort your Excel for a particular attribute
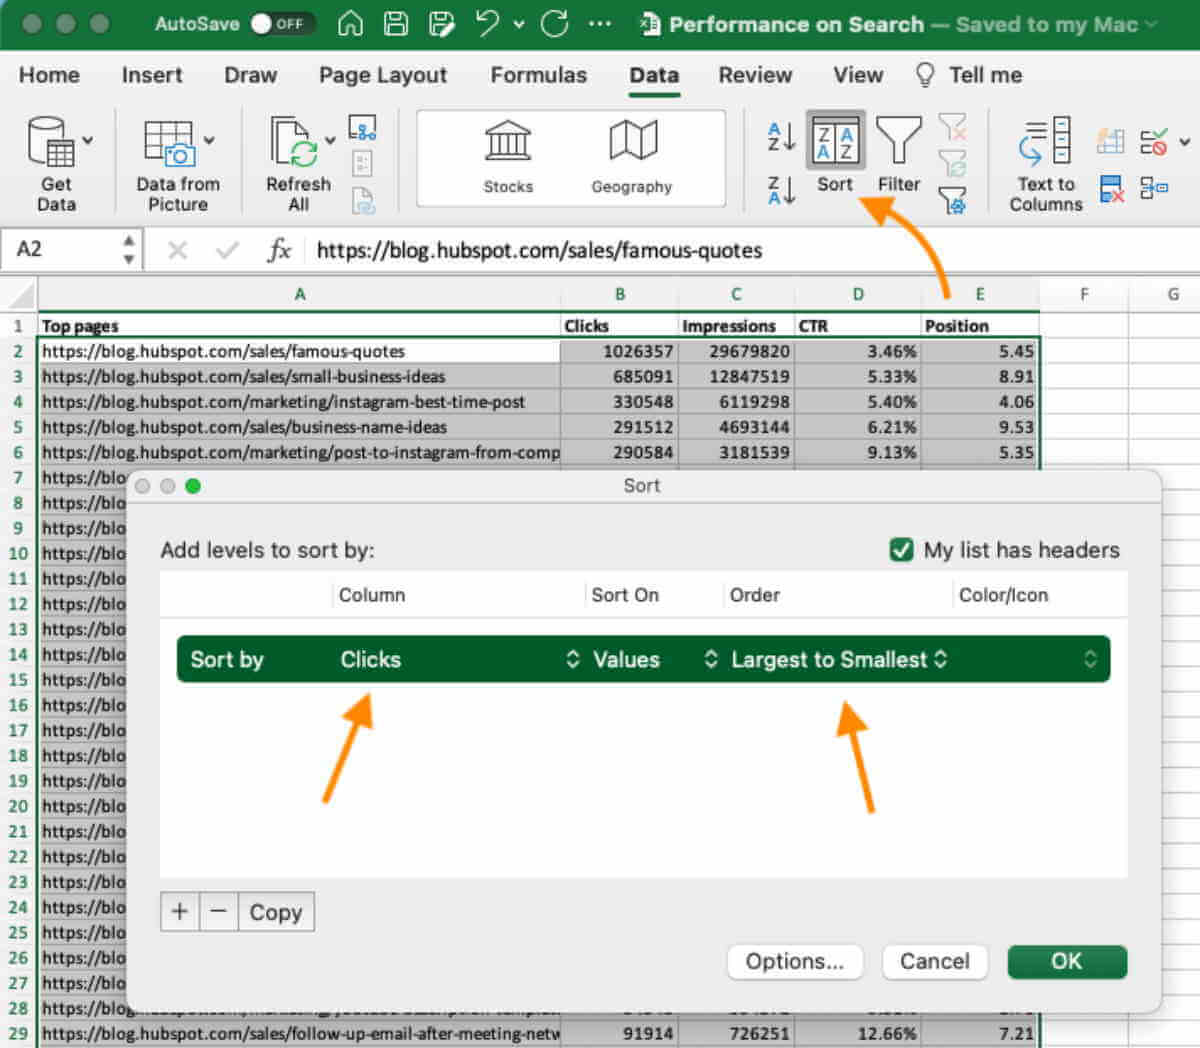
Click the Data tab in the top navigation bar and choose the Sort icon from the options. You may choose to arrange your data by any column and in any order in the window that opens.
Choose “Views to Date” as the column heading under “Column,” and then decide whether you want to sort your posts from smallest to largest or from largest to smallest.
You may successfully rearrange each row of your Excel sheet by the number of views each blog post has got by selecting OK in the Sort window’s bottom-right corner.

Step 3) Select the Cells for which the Pivot table needs to be created
After entering the data and sorting it in your Excel worksheet as you choose, select the cells you want to include in a pivot table by highlighting them.
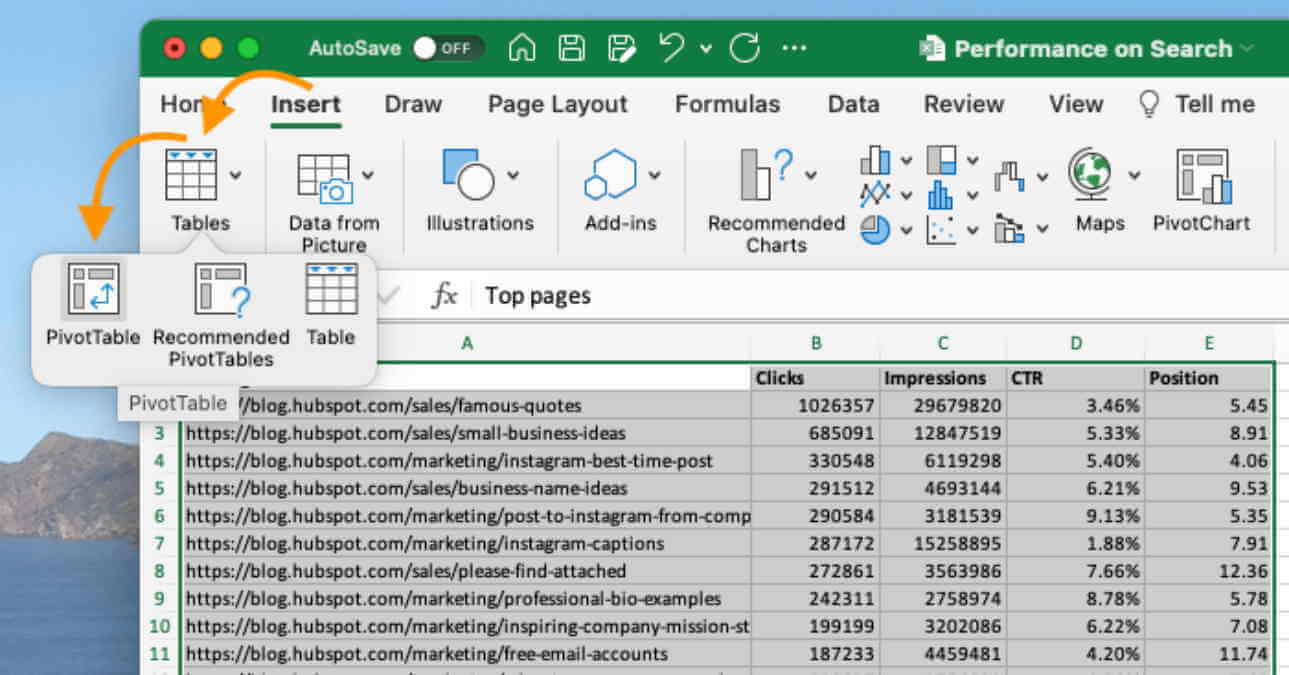
Select the PivotTable icon by clicking Insert in the top menu. You may also manually input the range of cells you want to be included in the pivot table by clicking anywhere on your worksheet, choosing “PivotTable,” and doing so.
This will open an option box where you can set your cell range and decide whether to launch this pivot table in a new worksheet or retain it in the current worksheet in addition to choosing your cell range.
At the bottom of your Excel worksheet, you may navigate to and away from any newly opened sheets. After making a decision, click OK.

To open a pivot table with pre-set recommendations for how to arrange each row and column, you can also pick Recommended PivotTables to the right of the PivotTable icon while your cells are highlighted.
Step 4) In the Row Labelled area, Drag and Drop the field required
When Step 3 is finished, Excel will produce a blank pivot table for you. The next step is to drag and drop a field into the Row Labels section with a label corresponding to the columns’ names in your spreadsheet.
By doing so, you may choose the distinctive identifier—blog post title, product name, etc.—by which the pivot table will arrange your data. For illustration, suppose you wish to categorise a lot of blogging data according to article titles. Simply click and drag the “Top pages” box to the “Row Labels” section to do that.
Step 5) Drag and Drop the field in the Values area, then Calculate
The next step is to add some values by dragging a field into the Values box once you’ve decided how to organise your data.
Let’s use the blogging data example again and imagine you want to sum up views of blog posts by title. Simply drag the “Views” field into the Values box to do this. By default, the total of a certain number will be computed, but you can alter this to anything else based on what you want to calculate, such as average, maximum, or minimum.
Pivot Table in Excel Shortcut Keys
The Insert PivotTable dialogue box will pop up once you pick any cell in your data collection and hit the shortcut keys ALT + N + V. From here, you can select where to place the new pivot table.
Use the shortcut keys ALT + D + S to change the data source for an existing pivot table rapidly. By doing so, the Change Data Source dialogue box will pop up, allowing you to choose a different data source for the pivot table.
Use the shortcut ALT + F5 to refresh all pivot tables in a spreadsheet rapidly. If you want to verify if a workbook with several pivot tables has been updated, doing so can save you time.
Summary
You now know how to create a pivot table in Excel. With this knowledge, you may determine what you want from your pivot table and locate the answers you seek.
For instance, the data in your pivot table might not be arranged in the way you’d prefer. Excel’s Sort tool can be useful in this situation. The VLOOKUP function, on the other hand, may be useful if you need to include data from another source in your reports.

